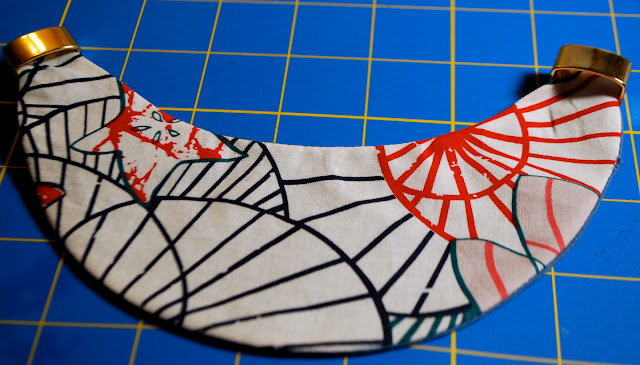
These necklaces are everywhere! I decided to try my hand at one last night, and was pleased at how it turned out. - You can really substitute a lot of these materials if you like! Be creative, as the possibilities are endless!
Gather your materials! You will need:
Scissors
Pins
Trim
Satin Cord
One Scrap Piece of Fabric - Front
Contrast Scrap Piece of Fabric - Back
2 Connector Pieces
Beads [Optional]
Applique's
Fray Check
Fusible Webbing [For attaching trim]
Sewing Machine - [Or needle & thread for hand sewing]
Start off by sketching your pattern onto a piece of paper - Sketch one side only
Fold paper in half, then cut out online outside. You should get a mirror image of the pattern.
Cut out the pattern
Take the two pieces of material and pin them RIGHT SIDE TOGETHER. Then pin the pattern on top. Once pinned, cut out pattern.
Machine sew material together [you can also hand sew]. Leave a 2 inch space in ONE corner. We will use this space to aid in turning the material inside out.
Here is my piece of fabric prior to turning it inside out.
Turn the fabric inside out, then press with an iron! Then hand sew the section that you left open.
This is a view of the back
Slide connector over piece of fabric
Use fusible webbing to secure the flap of material over the connector. [This is the point you will need your iron. Hold the iron over the area with the fusible web for about 20 seconds]
Turn piece over, and apply fusible webbing along end of piece. Place the trim on top. Iron.
This is what it should look like after attaching trim!
I decided to add a few beaded applique's instead of beads. I attached these using fusible webbing as well.
Take two pieces of satin cord and knot each piece around a connector. Trim excess cord around knot, use "fray check" to keep cord from fraying [you can also use super glue]
Make a knot [I added a bead for more of a decorative effect] on one end of the cord. On the other piece of the cord, make a loop. Trim excess cord, use "fray check" or super glue to keep cord from fraying.
Tuesday, February 23, 2010
DIY Statement Bib Necklace | The most potent muse of all is our own inner child – Stephen Nachmanovitch
Labels:
Bib Necklace Tutorial,
DIY,
DIY Goodness,
Statement Necklace
Subscribe to:
Post Comments (Atom)
Followers
Search This Blog
Blog Archive
-
▼
2010
(551)
-
▼
February
(51)
- L.S.O.B from S. Weymouth
- My First Giveaway! - The Beauty Blender
- Yes There is an App for that too!
- Interview with Jane Carter of The Jane Carter Solu...
- Roll Me Away Edited
- 5 Minute Face - The Pictorial
- A Few of My Pieces
- DIY Statement Bib Necklace | The most potent muse ...
- When I Get Where I'm Going
- Sometimes Less is More - My Best Braid Out to Date
- Red Velvet Cuppies
- New Friends
- My Bri
- Procrastination is the Grave in Which Opportunity ...
- The Social Media Bible
- Things That Make You Feel Good
- Which of my photographs is my favorite? The one I’...
- I Think I Found a Keeper
- Hello Luvah
- I Left My Heart In San Francisco
- Salt of The Earth
- A gem cannot be polished without friction, nor a m...
- [Supernova] a star that explodes and becomes extre...
- Day to Night
- Ethereal Light
- Feeling Alive
- Love At First Sight
- Zumba Baby!!
- Blue Black
- Hard Water? Read On...
- Valentines Video
- New Years Resolution #562 - Eat Healthy
- Know First, Who You Are; and Then Adorn Yourself A...
- The Natural Alternative to Serums & Hair Polishers
- I'm a Spring Leaf Trembling in Anticipation - Maya...
- Looking for an Excuse to Have a Bad Hair Day
- Jump Off
- Archangel Jeremiel
- Perfectly Coiffed
- Recession Friendly Pampering: The Korean Day Spa
- Objects In Mirror Are Closer Than They Appear
- Date Night
- These Are Kind of A Big Deal - My [not so] Secret ...
- Get 'Kini Ready With Kettlebells
- Tiger Woods Voicemail Slow Jam Remix
- Teyana Taylor, Give Me That Hair
- Calling All Transitioners - Transition Friendly Pr...
- New Arrivals
- Sweetest Hangover
- Michael Jacksons Tribute
- California Dreamin'
-
▼
February
(51)
0 comments:
Post a Comment